How to Build the Ultimate Anime Room (Without It Looking Like a Merch Dump)
Most anime rooms fail the same way.
Posters taped crooked. Three action figures stacked deep on one shelf. No rug. The overhead light blasting at 6500K making everything look like a dentist's office.
The room looks like a teenager's bedroom from 2014. Not curated. Not intentional. Just a pile of merch with nowhere to go.
Then there's the other room. The one that gets posted, screenshotted, copied. Eight thousand people save it on Pinterest. The difference isn't the budget. It's the framework.
Here's how to build an anime room that doesn't look like a merch dump.
Most Anime Rooms Fail for the Same 3 Reasons
The Pinterest version makes it look easy. Pick up a tapestry, a rug, some figures, hang it all up. Done.
But most rooms still look bad after spending real money. The three patterns:
No aesthetic direction. You bought pieces from six different anime in three different styles. The Demon Slayer Corps next to the Shadow Monarch next to the Saiyan Prince. Each piece looks fine alone. Together they look like a merch table at a convention.
Lighting ignored. Overhead ceiling light still blasting. Cool white at 6500K. Every other lighting choice you made (string lights, LED strips, lamps) gets canceled out the second the main light flips on.
No color palette plan. Every piece fights for attention. The eye has nowhere to land. Red against orange against pink against neon green. Looks like a checkout aisle.
Fix those three things first. Everything else is downstream.
The 5 Layers of a Real Anime Room
The framework:
- Aesthetic. The vibe you're committing to.
- Wall. The dominant visual piece.
- Floor. The anchor.
- Display. Figures, scenes, collectibles.
- Lighting. The part everyone skips.
Each layer builds on the previous one. Skip a layer and the room feels off. Get them in order and the room reads as one cohesive setup.
Layer 1: Pick the Vibe First
Before you buy anything else. The vibe decides every other choice. Colors, materials, lighting temperature, piece selection.
Six common vibes for anime rooms. Not all of them are equal.
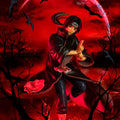
Dark moody otaku den. Low light, deep reds and blacks, dramatic shadows. Pairs with high-contrast IPs. The Black Swordsman, the Hashira, Tokyo Ghoul. Underrated. Most people skip this because they're scared of dark walls.
Minimalist anime. One or two statement pieces. Empty wall around them. White or light gray base. Reads as intentional and adult. Harder than it looks. Most "minimalist" rooms are just empty.
Maximalist collector. Every wall, every surface covered. Works only if every piece earned its spot. Requires real curation. Most attempts at maximalist look like merch graveyards.
Gamer-anime hybrid. RGB strips, dual monitors, neon accent lights. Pairs naturally with Solo Leveling (Shadow Monarch), cyberpunk anime, Akira. Easy to overdo on the RGB.
Studio Ghibli soft. Greens, warm wood, cream walls, plants. Overlaps with cottagecore. Pairs with slow-burn or nature-heavy IPs. Underrated for being too "soft". Works incredibly well for a reading-nook setup.
Cyberpunk / Akira. Neon pink and cyan, urban grit, glitch art. Specific aesthetic, doesn't blend with anything else.
Pick one. Commit. The failure mode is trying to do all six at once.
Layer 2: The Wall (Tapestry is King)
The wall is the dominant visual zone. The piece behind your bed sets the tone for everything else.
Tapestry is the highest-impact wall piece by a wide margin. Size, drape, presence. A 60x80 tapestry above the bed reads as art. A poster the same size reads as merch.
Best placements:
- Behind the bed. #1 placement, undisputed.
- Above the desk or behind a gaming setup. #2.
- Standalone wall as a focal piece. #3.
But not all tapestries last. Most cheap printed tapestries fade in months. Woven ones hold for years. We wrote the full breakdown in our woven vs printed tapestry guide. Read it before you spend money on a wall piece.
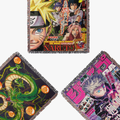
3D framed posters are the mid-tier option. More dimension than a flat poster. Less commitment than a full tapestry. Good for a second focal point on a different wall.
Gallery walls of multiple smaller pieces can work, but only with composition discipline. Odd numbers (3, 5, 7 pieces). Unified color palette. Consistent frame style. Most gallery walls fail because the pieces fight each other.
Browse the woven tapestry collection for the wall.
Layer 3: The Floor (Anchor the Whole Thing)
A rug isn't optional. The room feels unfinished without one, even if every other layer is dialed in.
The rug does two jobs. Anchors the visual weight to the floor so the room doesn't feel like it's floating. Ties the color palette together so the wall and floor read as one zone.
Pick the rug AFTER the wall piece is committed. The palette should echo, not compete. If the tapestry is dark with red accents, the rug should pick up those reds or stay neutral. If the tapestry is bright, the rug can ground the room with deeper tones.
Sizing:
- Dorm: 3x5 or 4x6 at the foot of the bed
- Standard bedroom: 5x7 half-tucked under the bed
- Dedicated room: 8x10 statement piece
Half-tuck trick: slide the rug halfway under the foot of the bed. The half showing reads as a centerpiece. The half under the bed adds anchor without forcing you to buy an 8x10. We broke down rug sizing, materials, and what to avoid in our best anime rugs guide.
Anchor the floor with a rug from our collection.
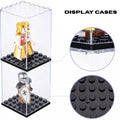
Layer 4: The Display (Where Most Rooms Get Crowded)
Floating shelves beat glass cases for the curated look. Glass cases say collector. Floating shelves say curated.
Brick-compatible mini figures are the underrated move here. They stack. They pose. They scene-build. You're not buying figurines. You're building micro-dioramas. The Demon Slayer Corps lined up in formation. The Hashira posed together. The Strongest Sorcerer in his coat. A scene works better than a row of standalone figures.
Mini figures rules:
- 4-8 per shelf max. Overcrowding kills the curated read.
- Group by IP. Don't mix series on one shelf.
- Use risers. Different heights make the display look composed instead of lined up.
- Light them. A shelf without accent lighting looks like a storage rack.
Brick-compatible mini figures from our collection start at $30 and ship next day. Compare against Etsy custom builds at $60-100+ with a 2-4 week wait.
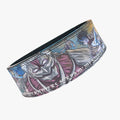
Embroidered key straps hang on a wall hook, a pegboard, or a corkboard. Lower-stakes way to repeat your favorite fandoms. They double as functional gear. Bag carry, keychain, lanyard.
The rule for display: every piece on the shelf should be one you'd want a friend to ask about. If you're not excited to point it out, it's filler.
Layer 5: Lighting (The Part Everyone Skips)
This is where the room is won or lost.
Lighting is the difference between a curated room and a kid's bedroom. Not the wall art. Not the figures. The lighting.
Kill the Overhead Light First
The single biggest upgrade you can make. Free.
Most ceiling lights are cool white 4000-6500K bulbs designed for office productivity, not vibe. They flatten everything. They cancel out every other lighting choice you make.
Switch the overhead bulb to a smart bulb you can dim. Or just leave it off and use lamps. The room shifts the second you stop blasting overhead. Like a different space.
The Three-Light Setup
Every good room uses three layers of light:
- Ambient. Lamps, string lights, LED strips. Low intensity. Fills the room.
- Accent. LED light boxes, RGB strips behind the tapestry, lit shelves. Adds drama.
- Task. Desk lamp, reading light. Focused. For doing things.
The mistake most rooms make: one light source for everything. Either the overhead is on and everything is flat, or only a desk lamp is on and the room is half-dark.
Three layers means you can set the mood. Work mode bright, relax mode dim, vibe mode all accent and no task. Same room, different feel.
Warm vs Cool. Match Your Aesthetic.
2700-3000K (warm white) for cozy. Ghibli vibe. Dark moody den. Anything that wants to feel lived-in.
5000-6500K (cool white / daylight) for cyberpunk. Akira vibe. Gaming setup with RGB accents.
Don't mix. A warm overhead lamp with cool LED accents reads as broken. Pick a temperature and run it through the room.
RGB Is for Cowards (Pick Two Colors)
The rainbow scroll is the giveaway. If your RGB is cycling through every color, you didn't curate. You defaulted.
Pick two colors and stick to them. Pink and cyan for cyberpunk. Red and amber for dark moody. Purple and blue for the Shadow Monarch's aesthetic. Two colors holds the palette together. Rainbow scroll breaks it.
Use the smart bulb app to set static scenes you can flip between. One scene per mood.
LED Strips Behind the Tapestry
Cheapest lighting upgrade with the biggest impact.
Stick an LED strip on the wall behind your tapestry, hidden from view. Color of your choice. The strip casts an even glow on the wall around the tapestry, creating a halo effect that pulls the whole piece off the wall.
Same trick works under the bed, behind a desk monitor, or under floating shelves. Hidden source, indirect glow.
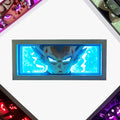
LED Light Boxes (The Move Most Rooms Miss)
This is where rooms separate.
LED light boxes are backlit acrylic panels with anime art that double as wall art and ambient lighting. They sit on a shelf or hang on the wall. Off, they look like art. On, they glow with the design.
Most setups skip them. The setups that get posted online don't.
Place one above a desk, on a bookshelf, or as a nightstand piece. Stack two or three on a shelf for a gallery effect. Pair with the LED strip behind the tapestry and the room has full ambient lighting without a single overhead bulb on.
Browse the LED light box collection. This is the layer most rooms miss.
Putting It Together: 3 Room Setups by Size
The Dorm Room (8x10 to 10x12)
Tight space, limited wall, no overhead light control.
- One tapestry behind the bed, medium size (50x60)
- 3x5 or 4x6 rug at the foot of the bed
- One LED light box above the desk
- 4-8 mini figures on a single floating shelf
- One desk lamp (warm white) to replace the dorm overhead
- LED strip along the back of the desk for accent
Total budget if you keep it lean: $200-350.
The Standard Bedroom (12x14)
Real wall space, multiple zones.
- Tapestry behind the bed, large (60x80)
- 5x7 rug centered or half-tucked under bed
- Two LED light boxes flanking the bed, or stacked above the desk
- Two floating shelves for figures (one mini figures, one full-scale)
- LED strip behind the headboard
- Lamp on the nightstand (warm), desk lamp (cool if gaming), no overhead
Budget: $400-700.
The Dedicated Anime Room
Aspirational target. Most readers won't have this. Most readers will dream toward it.
- Two tapestries on opposing walls (different IPs, same color palette)
- Statement rug (8x10 if room allows)
- 3-4 LED light boxes scattered as accent
- Wall of figures on multiple display shelves
- Gaming setup or reading nook as second focal point
- Layered lighting on dimmers. Overhead off, accent everywhere.
- Mini figures composed into scenes across multiple shelves
Budget: $800-1500+.
Mistakes That Ruin Even a Big Budget
Even with money, these wreck the room:
- Buying everything from one IP. Feels obsessive, not curated.
- No color palette plan. Every piece fights for attention.
- Overhead light still on. Kills every other lighting choice.
- Too much wall coverage. Visual chaos, eye has nowhere to rest.
- Mass-produced poster prints next to premium pieces. Cheapens everything around them.
- RGB color scroll. Means you didn't pick a palette.
- Skipping the rug. Room feels unfinished.
- Buying figures with no display plan. They end up in piles.
- Mixing scales without a plan. Full-scale figures next to mini figures next to keychains with no hierarchy.
Color Palettes That Work
The room base should be neutral so the art pops. Walls in white, light gray, charcoal, or deep navy.
Two accent colors max. Three is the ceiling.
Working palettes:
- Black, red, white. Works for almost any shonen. The Black Swordsman, Tokyo Ghoul, the Demon Slayer Corps.
- Black, cyan, magenta. Cyberpunk, Akira, Ghost in the Shell, Shadow Monarch.
- Sage green, warm wood, cream. Ghibli, cottagecore overlap, soft anime.
- Charcoal, amber, cream. Dark moody den. Pairs with most fantasy IPs.
Pull the accent colors from your favorite piece. Match other accents to it. Don't pick colors abstractly. Anchor them to a specific tapestry, rug, or figure.
How Ours Are Different
Star Kagune was built for the Shelf Builder. Not the impulse buyer.
Every category in this post (tapestries, rugs, LED light boxes, mini figures, key straps, 3D posters) we sell. Designed for the buyer who cares about how the room looks as a whole.
Over 600 verified reviews. Ships next day from Houston.
For comparison: real custom on Etsy runs $60-100+ with a 2-4 week wait. We do custom-look quality at non-custom price, shipped tomorrow. Mini figures and keychains start at $30.
Build your room from one collection.
Frequently Asked Questions
How do you make an anime room on a budget?
Pick one anchor piece (a tapestry or a rug) and build outward over time. Start with $50-100 for the anchor, then add lighting next (LED strip plus one light box for $40-60), then figures last. Total under $250 if you stage it. The mistake is buying ten cheap things at once instead of one good thing.
What lighting is best for an anime room?
Three-layer setup: ambient (lamps, LED strips) plus accent (LED light boxes, strips behind the tapestry) plus task (desk lamp). Kill the overhead light. Use warm white 2700-3000K for cozy or cool white 5000-6500K for cyberpunk. Two RGB colors max.
Where do you put an anime tapestry?
Behind the bed is the #1 placement. Above the desk or behind a gaming setup is #2. Avoid hanging it on a wall you walk past. Tapestries are for focal walls you actually face. A 60x80 size works for most beds, 50x60 for dorms.
How many figures should I display?
4-8 per shelf, max. Overcrowding is the failure mode that kills more displays than anything. Group by IP. Use risers for varied heights. Light the shelf. If you can't see every figure clearly from across the room, the shelf is too crowded.
What rug size for an anime bedroom?
5x7 or 5x8 for a standard bedroom. 3x5 or 4x6 for a dorm. Half-tuck a 5x7 under the foot of the bed for the visual impact of a larger rug without the price. 8x10 only if you have a dedicated anime room.
How do you make an anime room not look childish?
Three things. Kill the overhead light. Limit your IPs to 1-2. Invest in one quality anchor piece instead of ten cheap posters. The childish-room look comes from cluttered cool-white lighting, mixed IPs, and mass-produced merch with no curation.
What colors work best for an anime room?
Neutral base (white, light gray, charcoal, deep navy) plus 2 accent colors max. Pull the accents from your favorite piece. Black, red, and white works for shonen. Charcoal and amber for dark moody. Sage green, wood, and cream for Ghibli. Avoid pulling colors from too many different IPs.
How do you start an anime collection room?
Pick the vibe first. Then the wall piece (tapestry or 3D poster). Then the rug to anchor the palette. Then lighting. Figures last. Most people build in the wrong order. They buy figures first, then try to design the room around the figures, and the room never feels intentional.
The Room People Screenshot
Eight thousand saves. Three thousand comments. "Where did you get the tapestry?" "What lights are those?" "Drop the rug link."
That's the room.
Not the one that happens by accident from buying merch over five years. The one that was built. Vibe picked first. Wall, floor, display, lighting in order. Two accent colors. One anchor piece per layer.
The Shelf Builder doesn't decorate. They build.
Start building from our full collection. Pick the vibe. Then the anchor. Then the room comes together.